Magic ball
Goto page Previous  1, 2, 3, 4, 5, 6, 7  Next
 
Post new topic   Reply to topic    The Origami Forum Forum Index -> Diagrams & Crease Patterns
Author Message
JeossMayhem
Forum Sensei
Forum Sensei


Joined: 01 Oct 2006
Posts: 640
Location: Bellingham, Washington, USA

PostPosted: Fri Apr 04, 2008 1:21 pm    Post subject: Reply with quote   

Alright here we go. Blue are mountain folds, Red are valley folds. Note, this is a diagram to show you how to do the patter, not the magic ball. That model requires a much larger grid.

1) Divide your paper into an 8x8 grid perpendiculary and in 16ths diagonally.
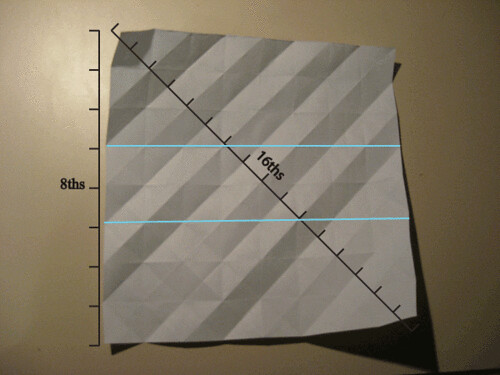
Then make two mountainfolds on the 3/8ths and 5/8ths creases as shown.

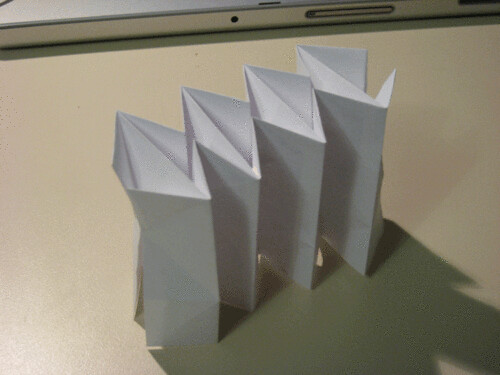
2) Here's what it should look like. Fold the ends inwards, so basically you end up with an open-box shape. See pic three for clarifaction.
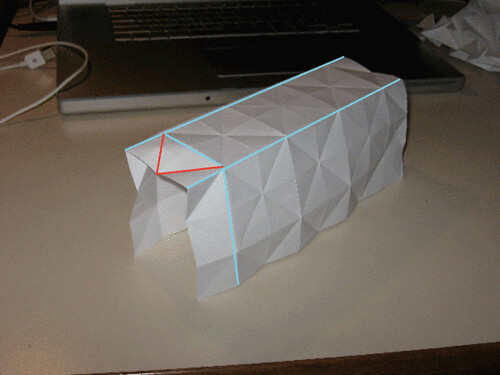

3) So good so far?


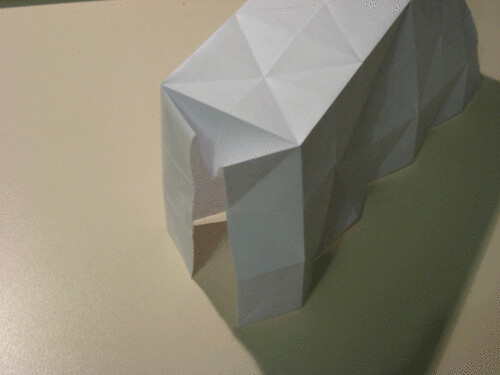
4) Repeat the same process. The sides squish in.


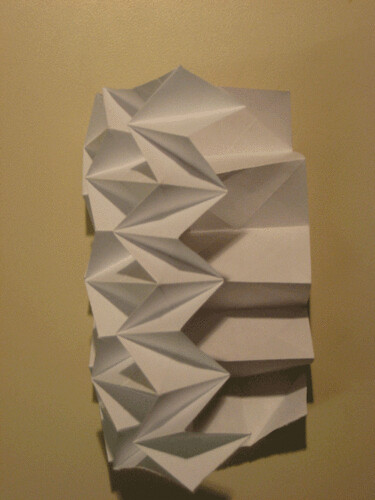
5) Here's what you should end up with. Repeat step 4 along this row.


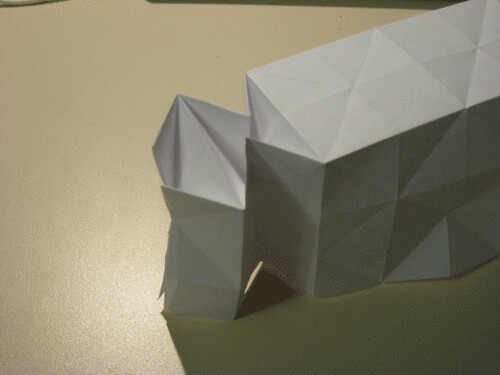
6) This is the first row finished. Turn your model to the side for step 7.


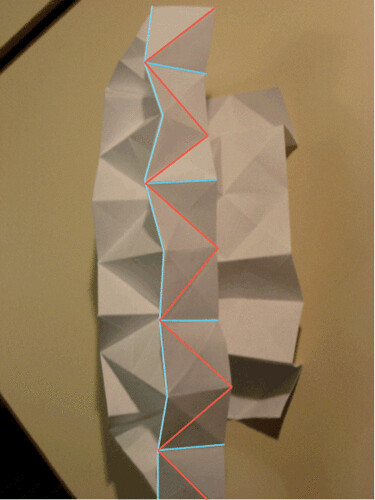
7) Essentially you're pulling up the sides. Don't pay attention to the direction the creases are going in the picture, just stick to the color of the crease lines and you'll be fine. You're performing reverse folds here.


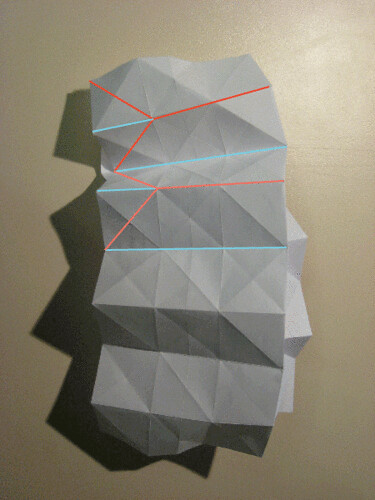
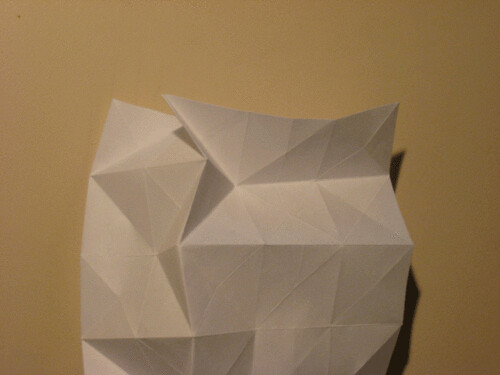
8) Here's a close-up of step 7, with the creases half-folded in the proper directions.


9) Just mirror what you have already folded on the other side.


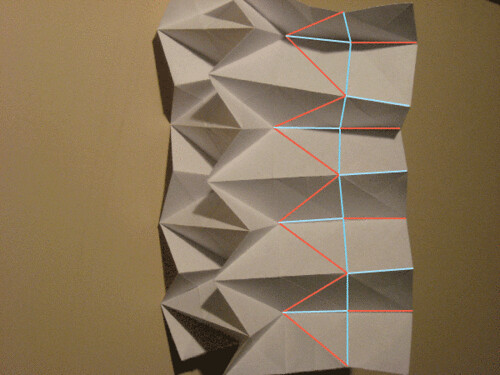
10) Again, from the side, continuing with the pattern. Lots of reverse-folds.


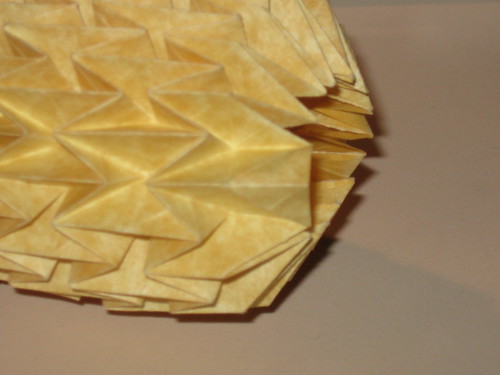
11) Here's one side finished. Practice steps 7-12 on the other side. By now you should get the idea.

_________________
Check out my blog!
http://www.jeoss.wordpress.com
Back to top
View user's profile   Send private message   Send e-mail   Visit poster's website   AIM Address      
esamerica
Newbie


Joined: 03 Apr 2008
Posts: 10

PostPosted: Fri Apr 04, 2008 2:52 pm    Post subject: Well done Reply with quote   

Hats off to you Sir.
Thanks
Back to top
View user's profile   Send private message   Send e-mail            
JeossMayhem
Forum Sensei
Forum Sensei


Joined: 01 Oct 2006
Posts: 640
Location: Bellingham, Washington, USA

PostPosted: Fri Apr 04, 2008 9:56 pm    Post subject: Reply with quote   

Judging from the tiles I made from a 32x32 grid... I think the magic ball is made out of a rectangle with a ratio of 1:2, making your grid 16x32 (perpendicular to the edge of the paper). I might be wrong but that wouldn't be a bad place to start.
_________________
Check out my blog!
http://www.jeoss.wordpress.com
Back to top
View user's profile   Send private message   Send e-mail   Visit poster's website   AIM Address      
esamerica
Newbie


Joined: 03 Apr 2008
Posts: 10

PostPosted: Sat Apr 05, 2008 3:27 pm    Post subject: got it Reply with quote   

My god what a pain these pleats are but it was well worth the effort now I can begin on the ball
thanks again
Back to top
View user's profile   Send private message   Send e-mail            
Diopside
Super Member
Super Member


Joined: 19 Oct 2006
Posts: 143
Location: Hungary

PostPosted: Sun Apr 06, 2008 9:35 am    Post subject: Reply with quote   

A silly question:
Where are they pieced together?Very Happy
I counted the ratio: 10:20
Back to top
View user's profile   Send private message               
JeossMayhem
Forum Sensei
Forum Sensei


Joined: 01 Oct 2006
Posts: 640
Location: Bellingham, Washington, USA

PostPosted: Sun Apr 06, 2008 10:16 am    Post subject: Reply with quote   

I'm not sure I understand your question... maybe it's because I just woke up.
Do you mean you counted the number of tesselations to be 10x20? I folded the magic ball two nights ago from a 32x16 (making a 16x8 tesselation), and when you overlap and glue the first and last rows together (which I haven't actually done yet), it looks identical to the one in the video.
_________________
Check out my blog!
http://www.jeoss.wordpress.com


Last edited by JeossMayhem on Sun Apr 06, 2008 11:46 am; edited 1 time in total
Back to top
View user's profile   Send private message   Send e-mail   Visit poster's website   AIM Address      
Diopside
Super Member
Super Member


Joined: 19 Oct 2006
Posts: 143
Location: Hungary

PostPosted: Sun Apr 06, 2008 11:11 am    Post subject: Reply with quote   

Hm, i might questioned that:)
So, if i glue the first and the last rows it would be good, now i understand:)
But theres one more thing i dont understand, the horizontal lines on the cp, look like they are valley fold, so they are like this - - - - , or its the problem of the enlargement.
Anyways, i started it, im still working on it, and i use a pen to mark the folds.
I think, in this way, it won't be hard to be done.
Sorry for my english, it has weakened in the last half year, i didnt learn english since that:S
Back to top
View user's profile   Send private message               
JeossMayhem
Forum Sensei
Forum Sensei


Joined: 01 Oct 2006
Posts: 640
Location: Bellingham, Washington, USA

PostPosted: Sun Apr 06, 2008 11:31 am    Post subject: Reply with quote   

Hmm, yea, I didn't fold mine from the CP he had and I quite frankly I don't know how he would get what's in his picture with that size. I folded it from looking at the picture alone, I'm pretty sure that all that really matters is that you have a paper with side ratios of 1:2.

The horizontal and vertical lines are all __.__. mountain folds.
_________________
Check out my blog!
http://www.jeoss.wordpress.com
Back to top
View user's profile   Send private message   Send e-mail   Visit poster's website   AIM Address      
gozim
Newbie


Joined: 19 Dec 2007
Posts: 5

PostPosted: Mon Apr 14, 2008 10:56 am    Post subject: How do i fold the edges?? Reply with quote   

Hello expert folders.

I used your vivid images to fold the Ori-Ball, but how do I get the ends to become pointy like the model in the youtube clip?? mine have become flat.
I wanted to attach a photo but i dont know how to do it?!?
thanks!!
Ilan
Back to top
View user's profile   Send private message               
Jonnycakes
Buddha
Buddha


Joined: 14 Jun 2007
Posts: 1229
Location: Ohio, USA

PostPosted: Mon Apr 14, 2008 11:09 am    Post subject: Reply with quote   

It looks like the ends angle inwards because of a slight crimp all around the top and bottom of the ball.
_________________
My Flickr
Back to top
View user's profile   Send private message   Send e-mail   Visit poster's website   AIM Address      
JeossMayhem
Forum Sensei
Forum Sensei


Joined: 01 Oct 2006
Posts: 640
Location: Bellingham, Washington, USA

PostPosted: Mon Apr 14, 2008 1:44 pm    Post subject: Reply with quote   

Yea, just inside-reverse fold the ends to make the point. Just fold the last row of your grid to points instead of squares.

I should post a picture of it since I haven't folded anything for quite some time, save the magic ball...... Crying or Very sad
_________________
Check out my blog!
http://www.jeoss.wordpress.com
Back to top
View user's profile   Send private message   Send e-mail   Visit poster's website   AIM Address      
yeah4metoo
Newbie


Joined: 15 Apr 2008
Posts: 1

PostPosted: Tue Apr 15, 2008 4:17 pm    Post subject: Reply with quote   

I found it easier tocoax the proper folds in place ,if, after making all my initial folds. I fan folded my paper starting at 1 short end to the other and attempting to keep those fan folds in place as i worked the 1st row of pleats in then pinchini the pleated end I reversed the fan fold for the next row each time as i worked across to the other side.
_________________
granny knows!!
Back to top
View user's profile   Send private message               
JeossMayhem
Forum Sensei
Forum Sensei


Joined: 01 Oct 2006
Posts: 640
Location: Bellingham, Washington, USA

PostPosted: Tue Apr 15, 2008 5:07 pm    Post subject: Reply with quote   

Yea, whatever worlks. It is easier if you precrease all of the folds, but more creases not only weakens the paper more, but shows up more in the end. I folded mine from parchment paper, which is fairly durable, but I still had some holes form from stress. I decided not to fold some of the precreases because of this, but it still came out fine (after extra-careful folding).

Here's a close-up of the end, with the creases of the reverse-fold fairly apparent:


And here are some more pics. It looks nearly identical to Kade's I think but I can't find differences that stem from folding a slightly different CP than his...

Easter egg? Kind of late....


Relatively spherical


And squashed

_________________
Check out my blog!
http://www.jeoss.wordpress.com
Back to top
View user's profile   Send private message   Send e-mail   Visit poster's website   AIM Address      
TheRealChris
Forum Moderator
Forum Moderator


Joined: 17 May 2003
Posts: 1591
Location: Germany

PostPosted: Thu Apr 17, 2008 3:20 pm    Post subject: Reply with quote   

I did it, thanks a lot Smile

Back to top
View user's profile   Send private message      Visit poster's website         
JeossMayhem
Forum Sensei
Forum Sensei


Joined: 01 Oct 2006
Posts: 640
Location: Bellingham, Washington, USA

PostPosted: Thu Apr 17, 2008 5:06 pm    Post subject: Reply with quote   

No prob. Happy to help.
_________________
Check out my blog!
http://www.jeoss.wordpress.com
Back to top
View user's profile   Send private message   Send e-mail   Visit poster's website   AIM Address      
Display posts from previous:   
Post new topic   Reply to topic    The Origami Forum Forum Index -> Diagrams & Crease Patterns All times are GMT - 7 Hours
Goto page Previous  1, 2, 3, 4, 5, 6, 7  Next
Page 2 of 7

 
Jump to:  
You cannot post new topics in this forum
You cannot reply to topics in this forum
You cannot edit your posts in this forum
You cannot delete your posts in this forum
You cannot vote in polls in this forum


Powered by phpBB © 2001, 2002 phpBB Group