Page 7 of 10
Posted: May 30th, 2009, 11:00 pm
by ftangdude55
The CP has a grid of 20ths.
Posted: May 31st, 2009, 4:36 am
by darkeagle
thanks
Posted: June 4th, 2009, 12:56 am
by Kijjakarn
I agree with Origamimasterjared. Realising that photodiagram and diagram are folding sequence, they make no difference.
If I'm wrong, I'll apologise.

Posted: July 21st, 2009, 4:43 pm
by PauliusOrigami
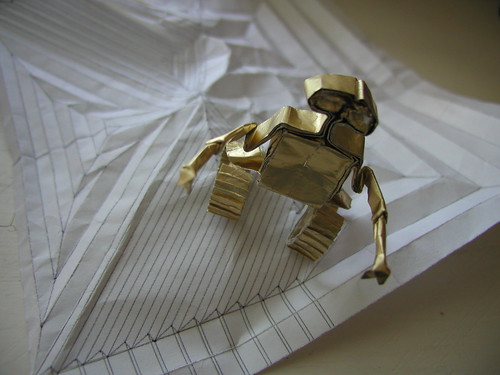
This is my fold Of wall-e. I folded this long time ago : )
Posted: July 23rd, 2009, 6:02 am
by chesslo
wow, nice wall-e, good choice of paper as well!!!!!!!!!!
Posted: July 23rd, 2009, 8:08 am
by PauliusOrigami
well, i, actually, used golden foil from the chocolate package ;DDD Now Wall-E smells like a chocolate ;D mmm

wall E folding
Posted: August 2nd, 2009, 9:57 am
by origamifinch
I get how to fold it into its simple form but how do you put on the plate disign.

Posted: November 14th, 2009, 4:25 pm
by Falcifer
I've managed to semi-collapse the base, which actually took me less time than drawing out the CP and then creasing the lines, but I'm not entirely sure about the area of the CP between the tracks and the pleated section.

Could someone post an enlarged version of that section, please?
Posted: June 21st, 2010, 2:13 am
by superjugy
Hi there, i've never done a CP before, i've done some other diagrams though. i'm trying the simplified version posted before. the one in
http://www.flickr.com/photos/32648308@N ... 968220709/ . following the simplified CP and the "in progress" pics i did mine but i'm stuck precisely where the pics end... from the last in progress picture it just went to finished :S . so i think i understand that pattern is mainly like a base but after that you have to follow like your instincts to do the wall-e? cause in that case i would need some advise. i don't know how to pass from this:
http://www.flickr.com/photos/32648308@N ... 968220709/ to the finished model. Thanks in advance for your help i will really appreciate it.
Posted: September 4th, 2010, 3:24 am
by PhillipORigami
I know this post is old, but I never seen anyone use copy paper+ aluminum foil. Sounds interesting.
Posted: September 6th, 2010, 10:49 am
by newbpcpfolder
Falcifer wrote:I've managed to semi-collapse the base, which actually took me less time than drawing out the CP and then creasing the lines, but I'm not entirely sure about the area of the CP between the tracks and the pleated section.
Could someone post an enlarged version of that section, please?
that looks like a technique used for doubling the number of pleats than you would get normally. Using quadrilaterals. I'm not sure how to do them, but here's a photodiagram of something similar:
http://www.flickr.com/photos/origami-ar ... 037798977/
Posted: September 6th, 2010, 4:25 pm
by orislater
those parts form the tire tracks. they are not hard but they can be confusing. as you start to flatten everything, the sides will not fold flat until you squeeze those parts together
Posted: September 6th, 2010, 6:00 pm
by newbpcpfolder
orislater wrote:those parts form the tire tracks. they are not hard but they can be confusing. as you start to flatten everything, the sides will not fold flat until you squeeze those parts together
yeah. I know. I never tried them before, but they sure look tricky. the molecules used in this CP are very simple, but the numerous number of sinks used in them is what makes this model complex.
Posted: September 6th, 2010, 8:31 pm
by orislater
you dont precrease the tire tracks. the will form naturally sort of... i will make p-d
Posted: September 7th, 2010, 3:08 am
by newbpcpfolder
orislater wrote:you dont precrease the tire tracks. the will form naturally sort of... i will make p-d
why not precrease/how can they arrange themselves?