Apparently 50cm square paper. Foil would be good, but hand-made paper which is wet-folded would be better.HankSimon wrote:Also, what size square yields what size Dwarf ? And what kinds of paper do you recommend ?
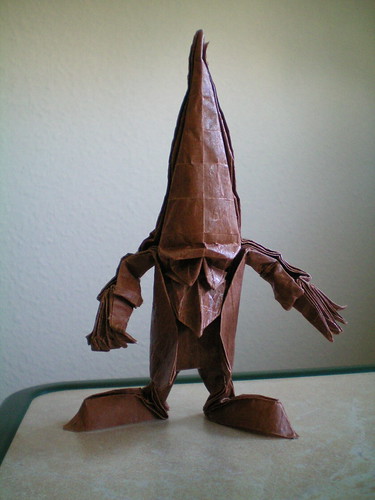
Eric Joisel - Dwarf (CP)
Forum rules
READ: The Origami Forum Rules & Regulations
READ: The Origami Forum Rules & Regulations
-
hobbestheprince
- Super Member
- Posts: 240
- Joined: December 29th, 2007, 2:06 am
- Contact:
Made it from a 21x21 copy paper square. This model is bloody easy. It's the first CP I've ever tried, and even though I am an inexperienced folder ( I really got into folding about 2 weeks ago ) I collapsed it in about 30 minutes ( after making all of the creases ).
I did make a few changes though ( the hat looks a bit different, for example, but it wouldn't be too hard to change it so that it looks like everyone else's hat. ) and I still have to add some details et cetera, but I'm still proud of the result.
http://img174.imageshack.us/my.php?imag ... 005et5.jpg
http://img267.imageshack.us/my.php?imag ... 006wl6.jpg
This has reallly boosted my confidence and now I really feel like practicing some other CP's and making a huge army of dwarves to take over the world... Oh wait, now I'm just ranting.
PS, copy paper is just rubbish
-
klnothincomin

- Senior Member
- Posts: 256
- Joined: February 12th, 2008, 2:06 am
- Location: Alpharetta, GA
- Contact:
Hi guys,
Im staring at this CP for about an hour and can't figure, how you fold it into those wonderful dwarfs!
Im very determind to make one, but i need some help from you.
how to start? is there any diagram(step by step) besids this CP that an help? if not, please give some clues for a good start.
once again im making a gift for my girlfriend. her nick name is 'dwarf' - so it would be perfect;)
thanks in advance for all your help
Bozar,
I made some very rough guidelines on how to collapse this CP (using paint ). I may be able to make a few photos of the collapsing process later on, but I probably wouldn't be able to finish those photos today, as I'm rather busy. I strongly suggest you also take a look at these pictures of the collapsing process. Anyway :
First, start off collapsing the part that is marked in red ( These will be his legs ). You just have to do some basic valley and mountain folds here :

After that you should collapse the part that is marked in red ( this part of the CP will form his arms ) on this image. Those lines that look like an arrow-tip at the sides are the dwarf's fingers. You don't have to fold them right away; you can add these 'details' later on.

While you're collapsing this part it shouldn't be too hard to collapse the hat ( again, marked in red ).

And finally, you should form 2 waterbomb bases from the red part. The green part should stay flat ( and should look like a square ).

And voila! Your dwarf should be pretty much finished now. You should bend his arms and make some shoes using ( I think ) outside reverse folds and you could also add some details to his face.
Hehe, I was about to go to sleep when I saw your post. I quickly printed out the CP and made another dwarf. I made several pictures of the collapsing process, so I hope they'll help you make your very own dwarf.
By the way, my dwarf doesn't look too good, because I'm rather tired and I was using copy paper, but if you use a larger sheet of paper yours should look a lot better.

Precrease :

Start collapsing the part that will form his legs and feet. The outside fold should be a mountain fold. :

Collapsing in progress :

Collapse one of the hands. The fold at the top should be a mountain fold.

Collapse the other hand. You should also form the fingers using inside-reverse folds. I didn't do it this time, because I was in a hurry

Form a double waterbomb base to shape the dwarf's torso. Collapsing in progress :

Side view while collapsing ( right side ) :

Nearly finished. The model should lie flat after you've formed its torso.

Fold the bottom flap to the back and the two flaps at the side towards the center of the model to form something that should resemble a jacket.

Crimp the legs to form shoes.
You should also either open sink or just mountain fold the parts that make the hat look like its been made by a blind squirrel with one hand.

And voila! You have your very own dwarf! Mine looks asif he had been raped by two whales, and he doesn't really seem to have a face, but I blame the paper and my tiredness.
Hope this helps. Give me a shout if you need more info about any of the steps.
It's me first floding CP!!!
Maybe too bad ,
but I will go on .

[img]http://www.mygdiy.com/bbs/attachment/Fi ... 5900c9.jpg[/img]
Maybe too bad ,
but I will go on .
[img]http://www.mygdiy.com/bbs/attachment/Fi ... 5900c9.jpg[/img]

Hope this helps. Mine is just one of the thousands of possible approaches, but I think you can figure out which flaps you should to stretch to get something similar to Joisel's one.
You can just stretch it and see the paper's behaviour, then try to turn it into a face. don't worry too much about it, it's just modeling.
Post some photos when done!
You can just stretch it and see the paper's behaviour, then try to turn it into a face. don't worry too much about it, it's just modeling.
Post some photos when done!
"Keep On Folding!!"
