Any idea how to collapse the CP of dwarf on Eric Joisel's site? I managed to collapse and fold the body and legs, I know where the hands are and I managed to collapse them too, but I have difficutlies with the hut and face.
Any help will be much appreciated. The CP is on Eric Joisel's site, direct URL follows now
http://www.ericjoisel.com/Site/creating.html
Thanks a lot
Eteokles
Eric Joisel - Dwarf (CP)
Forum rules
READ: The Origami Forum Rules & Regulations
READ: The Origami Forum Rules & Regulations
-
Brimstone

- Buddha
- Posts: 1729
- Joined: November 23rd, 2004, 3:59 am
- Location: Colombia, South America
- Contact:
Here's a picture of the base:  Large Picture
The hut is not difficult, the diagonal lines near the center of the paper are mountains (color side up). The face is something else. I didn't do a very good job with mine. I hoipe the base picture will helop you.
Large PictureThe hut is not difficult, the diagonal lines near the center of the paper are mountains (color side up). The face is something else. I didn't do a very good job with mine. I hoipe the base picture will helop you.
-
Wen Fu Kai

- Junior Member
- Posts: 64
- Joined: November 16th, 2006, 8:14 pm
- Contact:
I want to make a request: Will one of the Mods please change the title for this topic into a more descriptive title? : "Eric Joisel's Dwarf CP" would be better. This will help others in using the "Search" function.
Here is my collapse of the Eric Joisel's Dward into the base:

Here are my suggestions to collapsing this dwarf:
1. Construct a 24x24 grid (If you notice on Mr. Joisel's site -- the side margins say to divide into 6ths--but for the ease of the collapse throughout, construct a 24x24 then all your creases will fall into place.
2. The trickest step is the formation of the square for the belly. Notice how you form the other two diamonds (A and B) forming the belly square is the exact same way.
3. I have made a larger CP of what is posted on Mr. Joisel's site. Hopefully this will help all

Enjoy folding.
Here is my collapse of the Eric Joisel's Dward into the base:
Here are my suggestions to collapsing this dwarf:
1. Construct a 24x24 grid (If you notice on Mr. Joisel's site -- the side margins say to divide into 6ths--but for the ease of the collapse throughout, construct a 24x24 then all your creases will fall into place.
2. The trickest step is the formation of the square for the belly. Notice how you form the other two diamonds (A and B) forming the belly square is the exact same way.
3. I have made a larger CP of what is posted on Mr. Joisel's site. Hopefully this will help all
Enjoy folding.
Last edited by Wen Fu Kai on December 6th, 2006, 7:46 pm, edited 2 times in total.
-
Ondrej.Cibulka

- Buddha
- Posts: 1055
- Joined: January 9th, 2006, 4:18 pm
- Location: Czech republic
- Contact:
Perfect base, clear and clean.
Any suggestion about "final shaping"? When you will post second lecture?

Any suggestion about "final shaping"? When you will post second lecture?
Ondrej Cibulka Origami, www.origamido.cz

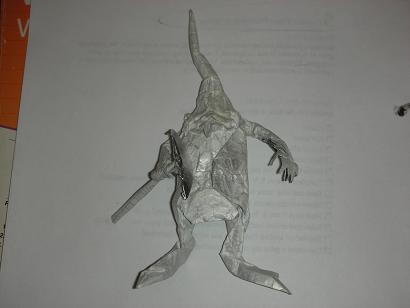
Here is mine....
More Here
Unfortunantly, I did not have the original picture to work from when I folded this model. As you can tell, I did not remember how the face went....
By the way, precreasing into 24th's gives you lots of uneeded creases. I just used the sixth's method as in the picture Josiel had.
More Here
Unfortunantly, I did not have the original picture to work from when I folded this model. As you can tell, I did not remember how the face went....
By the way, precreasing into 24th's gives you lots of uneeded creases. I just used the sixth's method as in the picture Josiel had.
Asian Rice- The best in the business...
Flickr Photos
Flickr Photos
-
Wen Fu Kai
- Junior Member
- Posts: 64
- Joined: November 16th, 2006, 8:14 pm
- Contact:


-
origamimasterjared

- Buddha
- Posts: 1670
- Joined: August 13th, 2004, 6:25 pm
- Contact:
There is not really much of a need for precreasing. I didn't do any apart from locating the line separating the top third from the rest. The paper would not take kindly to crease reversals...


8 inches tall, from an 18.5 inch square of blue lokta-foil (first try). I really wish I could take better pictures... (I don't really have a place in my dorm suite.)
8 inches tall, from an 18.5 inch square of blue lokta-foil (first try). I really wish I could take better pictures... (I don't really have a place in my dorm suite.)


I manage to fold this model too by printing the crease pattern.
But... I am trying now to get the folding sequence so to fold it without black lines from the printer showing on paper. I am stuck again on the creases that define head and hut. Can someone explain to me how to get those folds?
Any help, much appreciated
regards from Greece
Eteokles
But... I am trying now to get the folding sequence so to fold it without black lines from the printer showing on paper. I am stuck again on the creases that define head and hut. Can someone explain to me how to get those folds?
Any help, much appreciated
regards from Greece
Eteokles
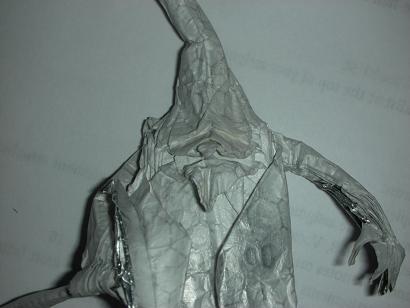
Since it seems you are colapsing the bottom 2/3 correctly, I will focus ony on the top 1/3.
I don't know what you are having problems doing, so this will just be an over arching explanation on precreasing.
As you can see the outside folds that form the hat conect to the verticle creases that pass through the water bombs in the middle of the paper.
To fold these crease, fold from the end of the verticle creases to the center line of the paper.
The next creases on the inside are just angle bi-sectors, so just fold the crease you jsut made to the center line.
The small crease at the bottom of the hat are also angle bi-sectors, so those are easy to get.
The crease that form the arms are easy to get.
To get the crease that comes from the center line fold the top edge to the first crease of the hat (the one we got first). Let the crease go down until it hits the 1/6 mark from the top of the paper (half of the 1/3).
The other crease you get by connecting the verticle creases to the intersection of the 1/6 and the crease you jsut made (self explanitory).
Fold all the box pleated crease. No simple way to get these, just fold them individualy.
Now just colapse the whole thing..... Start from the outside and work your way in.
For some reason I think that this whole totorial was a waste of time b/c I think you already knew how to get the creases. But, oh well, it may help someone else.
Asian Rice- The best in the business...
Flickr Photos
Flickr Photos
